
Man In the Picture : Selo
ketik command : e2fsck /dev/sdb1 (sdb1 adalah drive sistem)
klik yes sampai proses selesai
ketik command : e2fsck /dev/sdb1 (sdb1 adalah drive sistem)
klik yes sampai proses selesai
sudo apachectl start and press enterCan’t believe it’s that easy? It is! You should now see It works! in the browser.

Mac already comes with PHP, so you don’t need to install it from PHP.net. Before High Sierra (version 10.13), Mac came with PHP 5 installed. This caused users to get annoyed because it didn’t come with PHP 7, so you’d have to go through extra work to upgrade from PHP 5 to PHP 7. Thankfully High Sierra already comes with PHP 7.1!!!
sudo nano /etc/apache2/httpd.conf and press enter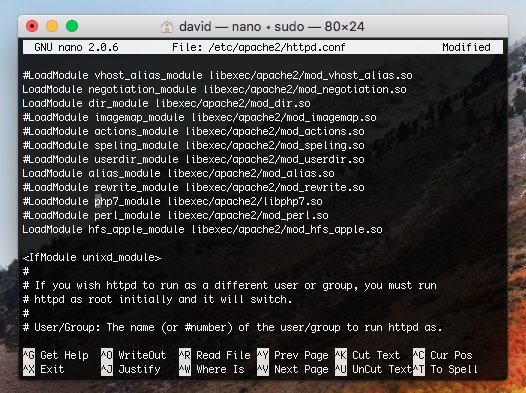
#LoadModule php7_module libexec/apache2/libphp7.so
sudo apachectl restart and press enter
You just turned PHP 7 on. Great work so far!

<?php
echo "Hello From Sites Folder!";
phpinfo();
?>
sudo nano /etc/apache2/httpd.conf
/Library/WebServer/Documents with /Users/david/Sites(instead of david use your name which can be found at the top of your terminal next to the home icon)
sudo apachectl restart and press enterGo back to Safari and refresh the localhost page and you’ll see Hello From Sites Folder! with PHP info that shows PHP 7 is being used.


sudo /usr/local/mysql/bin/mysql -u root -p
ALTER USER 'root'@'localhost' IDENTIFIED BY 'newpassword'; and press enter


<?php
$con = new mysqli("127.0.0.1", "root", "newpassword", "mydb");
$message = $con->query("SELECT message FROM myTable")->fetch_object()->message;
$con->close();
echo "$message <br/>";
echo "Hello From Sites Folder!";
phpinfo();
Obviously this example is immune to SQL injection, since there are no user-inputted values. However, if you don’t understand MySQLi prepared statements as well as you’d like, check out this post for an excellent tutorial on how to prevent SQL injection 😉. There's even a PDO version, if you prefer that more.

Great! You now have MySQL working, so you can use localhost to store information in databases.
Instead of going to localhost/profile.php?user=david, it looks nicer when you can go to localhost/profile/david. Let’s make this work by enabling mod_rewrite so you can use RewriteRules.
sudo nano /etc/apache2/httpd.conf followed by pressing enter#LoadModule rewrite_module libexec/apache2/mod_rewrite.so
sudo apachectl restartNow you can use friendly URLs when you develop using localhost.
This isn't necessary to make vanity URLs work, but I personally prefer using an .htaccess file, as it allows me version control it.
sudo nano /etc/apache2/httpd.conf followed by pressing enterAllowOverride controls, and press enterAllowOverride None to AllowOverride All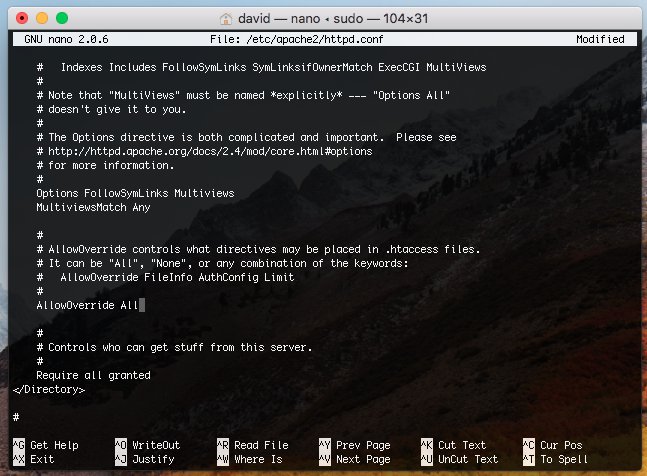
sudo apachectl restartNow you can add a .htaccess file in the Sites folder and it will work well.
Instead of accessing your website through localhost, you might want to access your website by going to https://localhost. If you turn on SSL, you’ll see a padlock next to localhost in the URL bar.
sudo nano /etc/apache2/httpd.conf followed by pressing enter
#LoadModule socache_shmcb_module libexec/apache2/mod_socache_shmcb.so#LoadModule ssl_module libexec/apache2/mod_ssl.so#Include /private/etc/apache2/extra/httpd-ssl.confsudo nano /etc/apache2/extra/httpd-ssl.conf and press enter
/Library/WebServer/Documents. Replace that with /Users/david/Sites. (Use your name instead of david just like you did earlier)<VirtualHost_default_:443> add (but make sure to replace david with your name):<Directory "/Users/david/Sites">
Options All
MultiviewsMatch Any
AllowOverride All
Require all granted
</Directory>

sudo nano /etc/ssl/openssl.cnf and press enter[ san ]
subjectAltName = DNS:localhost

sudo openssl req -extensions san -config /etc/ssl/openssl.cnf -x509 -nodes -newkey rsa:4096 -keyout /private/etc/apache2/server.key -out /private/etc/apache2/server.crt -days 365 -subj "/C=US/ST=Florida/L=Boca Raton/O=WebsiteBeaver/CN=localhost"
and press enter. (You can use your information instead, but don’t change localhost)
sudo security add-trusted-cert -d -r trustRoot -k /Library/Keychains/System.keychain /private/etc/apache2/server.crt
and press enter
sudo apachectl restart